Here's a floor we recently completed. It has also been our most shared and organically reached floor hitting over 65k views, not bad for a facebook page with less than four thousand followers. Anyways I'll be giving a overview of the floor along with the materials that we used to complete the project.
For all of our floors we start by profiling the surface. Most times this is done with a diamond grinder and occasionally we use a shot blaster if the material we are using calls for it. For this job we went with 12 grit single rombus diamonds on my fastprep grinder. We do this so that the floor has a profie for the materials to grab onto as well as opening the pores of the concrete so it can soak in for a better bond. We had to remove some silicone from the control joints which turned out to be a little more time consuming than expected. Once they were cleared out we prefilled them with silica sand and then added some general polymers 4700 quick cure patch so that we would be able to grind them smooth for a seamless looking floor.
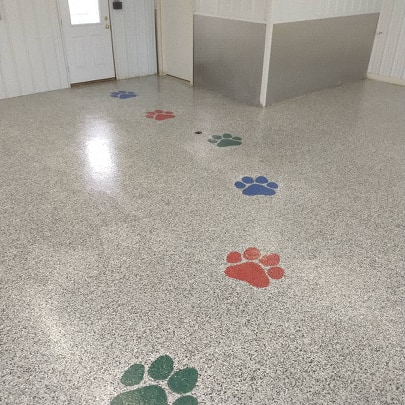
I talked the owners into letting me get creative and custom make six paw prints that were made of the same type of flake as the rest of the floor. Alot of companies will use stickers for custom pieces, where's the fun in that? I drew out the shape and cut it out of mdf board that I would use for my stencil. After it was done I traced out six on the floor going from the front door to the rear. Then we applied a base coat of epoxy and broadcasted our full flake system into them. By the time this was done we had about 7 hours into the project including the prepping of the floor. We decided to call it a day and wait till morning to do the body coat.
The next morning we scraped the loose flake and vaccumed the paw prints. The looked flawless. We got all our materials set out and organized for the main body of the floor. We used the Purepoxy fastcure epoxy for the body, once rolled out we did a full broadcast of the domino flake blend, one of the most common we do. After the flakes were thrown we had about two hours before we could be back on the floor. Time for lunch and being that we were in Ogilvie we hit up Finish Line for burgers till the floor was dry.
After the basecoat had dried we scrape the entire floor with metal scrapers. This helps break down any sharp spots that are sticking up as well as loosens any flakes that didn't adhere well. Then the the entire floor gets vaccumed and leaf blown to get up all the loose ones. The final step is applying a polyaspartic topcoat in a gloss finish. Once this is applied the floor can usually be walked on in about five hours and driven on in twenty four hours.